On this page
A crochet pattern generator can turn a photo into a color chart for a flat crochet project. To make that chart useful, choose your stitch technique, measure your gauge, and restrict the colors to yarn you can actually use. This tutorial follows a pet portrait through those decisions, from a cropped image to a checked chart and a small crochet sample.
You can bring those decisions into a crochet project app built with Atoms: keep your yarn palette beside the checked chart, calculate its dimensions from your gauge, and track the row you are working on. The steps below give you the inputs and checks for that app, followed by a complete build prompt.
Keep your yarn palette, gauge calculations, and chart progress in one app built with Atoms.
Choose a chart that matches your project
Start with a rectangular colorwork panel: a wall hanging, cushion front, or the picture area of a blanket. Decide how you will crochet it before choosing the generator settings. For the worked calculations below, one chart cell represents one US single crochet stitch, and one chart row represents one crocheted row.
Other techniques use different units. In corner-to-corner crochet, a chart cell can represent a whole tile; a filet chart uses a blocks-and-spaces convention. Select the appropriate project type and follow its stitch instructions. A color grid supplies the picture placement. Garment shaping, assembly, edging, and three-dimensional construction require their own instructions.
Stitch Fiddle's image-import documentation describes picture conversion for crochet Colors, C2C, and Filet projects. StitchingLab advertises editable charts, written rows, a materials list, and a row tracker. These are different starting points for organizing a project; inspect the output you need before committing to a large portrait.
Use this checklist when choosing a crochet pattern maker:
- Can you set or correct both the stitch count and row count?
- Can you edit individual cells and replace a color throughout the chart?
- Can you identify similar colors using letters or symbols?
- Does the export preserve row numbers, the legend, and the intended working direction?
- Can you inspect the chart before paying for an export or buying extra yarn?
Step 1: Crop the photo around recognizable features
Use a photo you own or have permission to adapt. Crop close enough that the pet's face occupies most of the picture area. Remove distracting background objects before conversion, especially objects that introduce colors you will not use.
Look at the cropped photo as a small thumbnail. Identify the features that make this particular pet recognizable: the outline of the ears, a dark patch around an eye, the shape of the muzzle, or a white blaze. Write down those features. They become your priorities when the generator reduces the image to a small grid.
A detailed photograph may produce scattered single cells after conversion. Simplify the background and keep the strongest facial marks, then inspect what remains. If the eyes disappear at the intended stitch width, try a tighter crop before increasing the entire project size. If a patterned collar consumes several colors, decide whether it contributes enough to the portrait to keep it.
Save the original image and the cropped version separately. That makes it easier to change the crop without repeating every later chart edit.
Step 2: Convert finished dimensions into stitches and rows
Measure a sample made with your actual yarn, hook, and chosen stitch pattern. The Craft Yarn Council's crochet gauge sheet explains that size depends on gauge and instructs makers to count both stitches and rows in a sample. Record those two measurements separately.
The following numbers are a hypothetical planning example:
| Planning input | Example measurement | Calculation |
|---|---|---|
| Picture-panel width | 12 inches | Target width before edging |
| Picture-panel height | 10 inches | Target height before edging |
| Stitch gauge | 16 stitches over 4 inches | 4 stitches per inch |
| Row gauge | 20 rows over 4 inches | 5 rows per inch |
| Chart width | 48 stitches | 12 × 4 |
| Chart height | 50 rows | 10 × 5 |
That panel needs 48 columns and 50 rows. Its 2,400 cells describe stitch positions; they do not tell you how many yards of yarn to buy.
The difference between stitch gauge and row gauge matters for the portrait. In this example, a stitch is approximately 0.25 inches wide and a row is 0.20 inches high. A square-looking arrangement on a screen can change shape in the fabric. Set the generator's gauge proportions or preview with the appropriate cell proportions before approving the face. Stitch Fiddle documents this control under Chart settings → Size.
Keep the picture panel separate from the border in your notes. Add edging dimensions after planning the image area. If the calculated size is inconvenient, adjust the target dimensions or crop and regenerate; keep a record of the gauge that each chart version uses.
Step 3: Build a palette from the yarn you already own
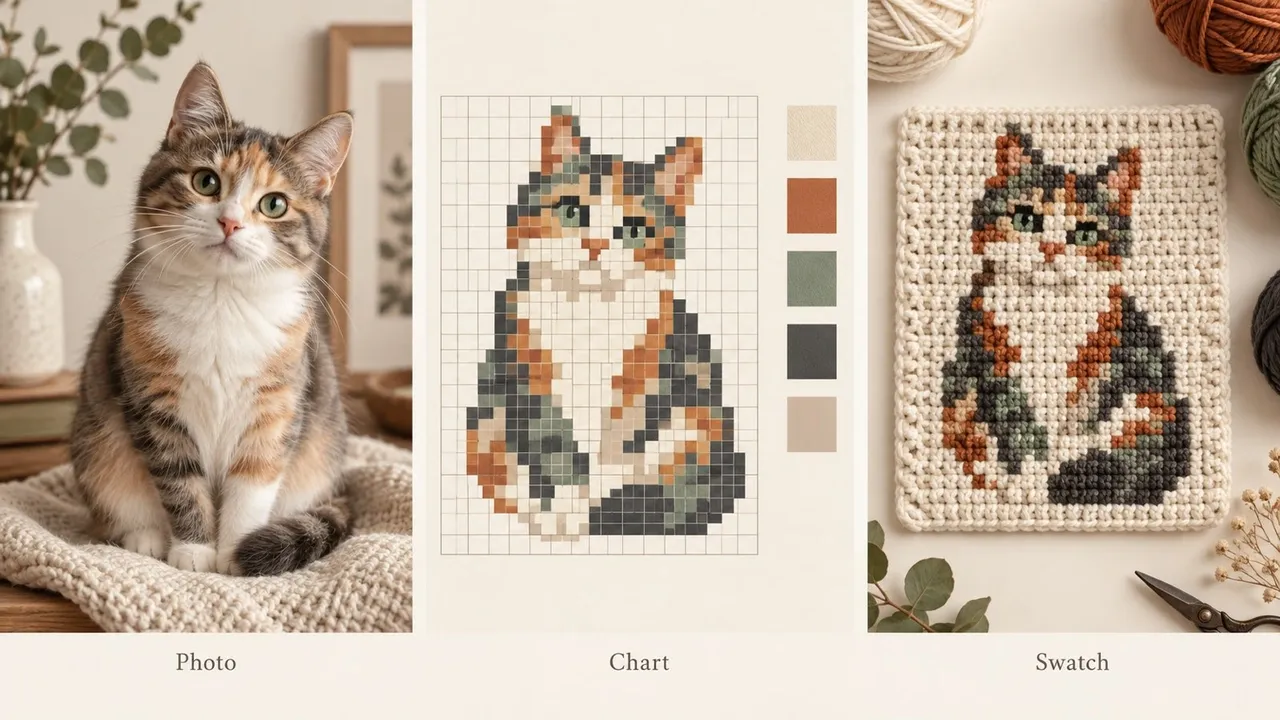
AI-generated illustration of the photo, chart, and swatch stages; not a verified crochet pattern.
Choose the physical yarn first, then map the chart to that palette. A generator's suggested colors are useful references, but a screen swatch cannot establish that you own the matching yarn or have enough of it.
For a simplified pet portrait, a starting palette might contain a light background, a main fur color, a dark outline color, and a contrasting facial mark. Four colors is an editorial starting point for this exercise, not a universal limit for photographs. Add a shade when it preserves a feature you care about; remove it when it only adds scattered changes.
Create a small project inventory:
| Yarn ID | Role in this example | What to record from your stash |
|---|---|---|
| A | Light background | Brand, color name, weight, available amount |
| B | Main fur | Same fields, plus a physical color sample |
| C | Eyes and outline | Contrast against A and B |
| D | Distinctive facial mark | Contrast against the neighboring fur |
Compare the yarn together in the light where you will work. Similar shades may look distinct on a monitor and merge in the finished panel. Assign a letter to each yarn and retain that letter in the chart legend, even if you later change its display color.
If your crochet chart generator supports a custom palette, restrict it to those yarn colors. If it chooses colors automatically, reduce the color count, then replace and merge colors in the editor. Stitch Fiddle's import guide describes automatic initial selection and subsequent chart editing. If the import screen does not accept your stash palette, make the replacements in the chart editor.
Keep the yarn's physical characteristics in view when using leftovers. A matching color alone is insufficient: make the sample with the actual combination you plan to use and assess the resulting fabric. When one yarn behaves differently, replace it or revise the project before committing to the full panel.
Step 4: Repair the features and color changes
Treat the first conversion as an editable draft. Zoom in to inspect individual cells, then zoom out to judge the whole portrait. Those views answer different questions: whether the instructions are manageable and whether the pet is recognizable.
Use the feature list from Step 1 to guide edits. Restore the eye patch or muzzle boundary if conversion lost it. Simplify stray background cells. Where several near-identical colors form a speckled area, try merging them into a continuous region and compare the face again.
A useful crochet graph maker should let you make these changes without losing the connection between chart cells and yarn IDs. After a global color replacement, check the legend and any generated written rows. StitchingLab says its written instructions and materials estimates rebuild after chart edits; verify that relationship in your own exported file.
Avoid smoothing every isolated cell automatically. A single dark cell could be an essential eye, while a single background speck may add work without improving the picture. Judge the role of the cell rather than applying one cleanup rule to the entire image.
Step 5: Check written rows with an asymmetric example
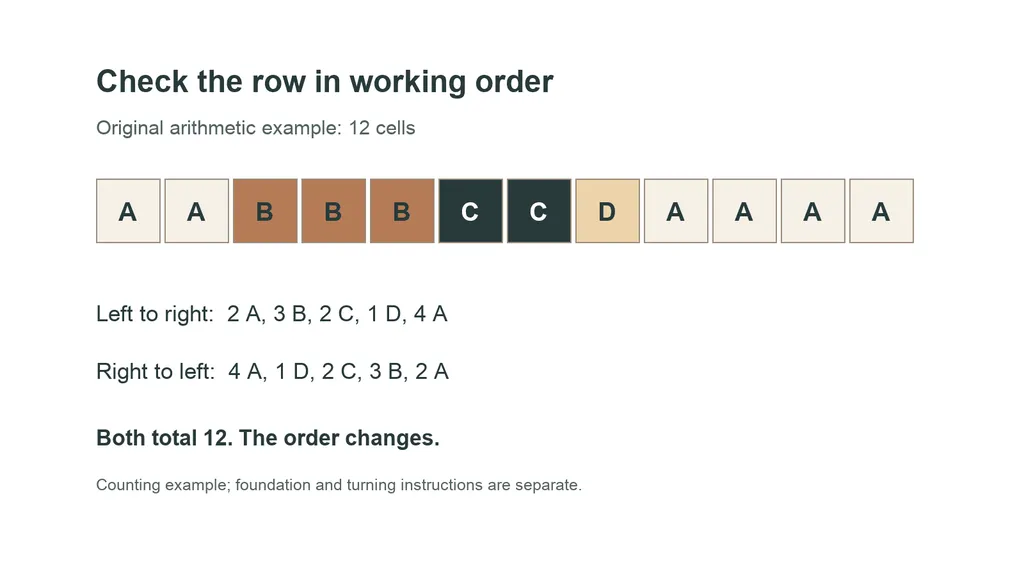
Original counting example: both directions total 12 cells, while color order reverses. Foundation and turning instructions are separate.
Check the row instructions before starting the portrait. Written color runs should add up to the chart width, and their order should match the direction in which you work the row.
Here is a small arithmetic example, independent of any generator. Read the displayed cells from left to right:
That gives 2 A, 3 B, 2 C, 1 D, 4 A, totaling 12 cells. Reading the same displayed row from right to left gives 4 A, 1 D, 2 C, 3 B, 2 A. The total stays 12, but the order changes. This checks counting and orientation; it is not a complete crochet pattern with a foundation and turning instructions.
Mark the chart's bottom, its first working row, and the direction for each row. If you turn the work, check how your pattern handles successive rows. Do not infer direction solely from the position of a row number. Left-handed makers should confirm the convention against their own working direction.
Use an asymmetric detail for this check, such as a patch on one cheek. A symmetrical face can hide a reversed chart. After editing the portrait, re-export it and compare a distinctive row against the cells again.
Step 6: Crochet a sample before estimating yarn
Make a sample containing the background, a dark edge, and a facial detail. Use the yarn-management method you intend to use for the panel. Check the actual dimensions, color contrast, and readability of the motif in the resulting fabric.
Per-color cell counts help describe the design's composition. They are not a direct yarn-volume measurement: a count does not include a measured allowance for tails, carried yarn, joins, or edging. If a tool supplies yardage, inspect its assumptions about technique and gauge.
For your own estimate, measure yarn consumed by a representative sample and record how it was made. If the sample does not resemble the panel's color-change pattern, crochet a more representative section before scaling the estimate. Compare the resulting estimate with the amount you have for each color, and include your finishing plan.
Save the checked chart, yarn legend, gauge, and sample notes together. A future yarn substitution changes the physical inputs, so make a new sample before relying on the old dimensions or yarn estimate.
Build your crochet project app with Atoms
Build a crochet project app in Atoms to keep your checked chart, yarn inventory, sample measurements, and row progress together. Atoms turns a conversational brief into a web app you can preview, change, and publish. Its Quick start guide describes the build and testing workflow, including stored data. Start with one project and use your own chart and yarn details to shape the app.
Use Atoms to build these connected screens:
- Yarn inventory: enter stable A–D IDs, color names, yarn weight, and available amounts beside the chart legend.
- Gauge calculator: enter stitches and rows per measured length, then calculate the columns and rows for your picture panel.
- Chart and row tracker: keep the checked chart visible while you mark a row complete and move to the next one.
- Project and sample records: save chart versions and sample notes so a yarn change stays connected to the measurements it affects.
Copy this complete prompt, open Atoms with the button below, and paste it into a new project:
Copy this brief into Atoms to build your own crochet project app.
In the preview, enter the example from Step 2 and check that the app calculates 48 columns and 50 rows. Rename a yarn color and confirm that its letter ID stays the same. Mark a row complete, reload, and use undo. Those checks connect Atoms' editable web-app workflow to the decisions you make while crocheting. Test the same actions on the published app before sharing it. Use your crocheted sample to check physical size, color contrast, and yarn consumption.
Conclusion
Choose your technique and physical yarn palette, calculate the grid from measured gauge, and repair the pet's defining features before exporting. Use a distinctive row to check direction, then crochet a sample before scaling the project. Take the checked chart and yarn inventory to Atoms and use the prompt above to build your crochet project app. Start with one panel, test its calculations and saved row progress, then add the features your next project needs.
Build one place to manage your yarn, checked charts, and crochet progress in Atoms.
Frequently asked questions
01Q1: Can I use a crochet pattern generator from an image of a drawing?
Yes. A drawing with clear boundaries can be a useful input for a color chart. Check that fine lines survive at the intended stitch width, and use artwork you own or have permission to adapt.
02Q2: How should I name the chart files when I try another yarn?
Use a version name that links the file to a dated yarn legend and sample record. Retain the original version so you can compare the change instead of overwriting the only checked chart.
03Q3: What should I include when sharing the chart with another maker?
Share the stitch technique, yarn legend, measured gauge, row-direction convention, and finishing instructions alongside the chart. Include which parts you actually crocheted and which remain a planning estimate.
